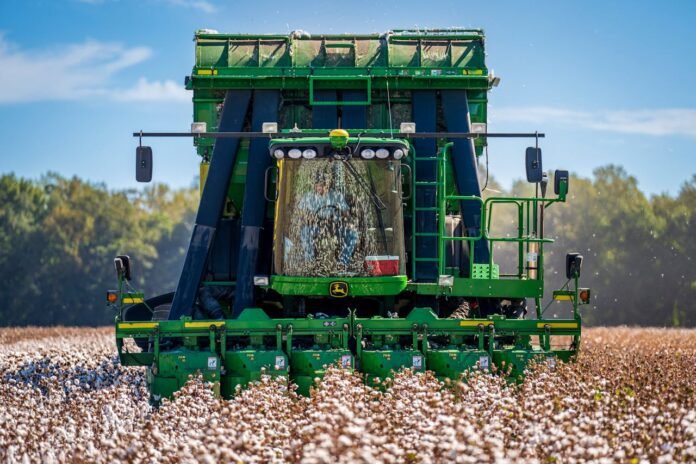
When it comes to maintaining and enhancing the performance of John Deere equipment, especially harvesters, understanding the intricacies of parts replacement is essential. This guide delves into practical steps for troubleshooting and upgrading harvester parts, ensuring your machinery operates at its peak efficiency.
Table of Contents
Introduction
John Deere has long been a trusted name in the agricultural industry, known for its reliable and robust machinery. However, even the best equipment requires regular maintenance and occasional part replacements to function optimally. For farmers and equipment operators, knowing how to troubleshoot and replace parts can mean the difference between a bountiful harvest and a season of setbacks.
Common Issues with John Deere Harvesters
Harvesters are complex machines with numerous moving parts, and over time, these components can wear out or malfunction. Some common issues include:
- Engine problems: Reduced power, stalling, or difficulty starting.
- Hydraulic system failures: Leaks, loss of pressure, or slow response.
- Electrical issues: Faulty wiring, dead batteries, or malfunctioning sensors.
- Wear and tear of mechanical parts: Worn-out belts, gears, and bearings.
Understanding these common problems is the first step in effective troubleshooting.
Troubleshooting Steps
Identifying the Problem
The first step in troubleshooting is accurately identifying the problem. This involves a thorough inspection and understanding of the machine’s operation. Pay attention to unusual noises, vibrations, or performance issues. Use diagnostic tools provided by John Deere, such as the Service Advisor diagnostic system, which can help pinpoint specific issues.
Consulting the Manual
John Deere provides comprehensive manuals for all their machinery. These manuals contain valuable information about the machine’s components, common issues, and troubleshooting steps. Referring to the manual can save time and provide a clear direction for solving the problem.
Checking for Error Codes
Modern John Deere harvesters are equipped with onboard computers that display error codes when something goes wrong. These codes can be crucial in identifying the specific component or system that needs attention. To decode these error messages, refer to the manual or an online database.
Visual and Physical Inspection
Sometimes, a simple visual inspection can reveal issues like leaks, worn-out parts, or loose connections. Additionally, physically checking parts for signs of wear and tear, such as cracks or fraying, can help identify what needs replacement.
Testing Components
For more complex issues, you may need to test individual components. This could involve checking electrical connections with a multimeter, testing hydraulic pressure, or running engine diagnostics. These tests can confirm whether a component is faulty or if the issue lies elsewhere.
Replacing John Deere Harvester Parts
Once you have identified the problematic part, the next step is replacement. Here’s a step-by-step guide to ensure a smooth and efficient replacement process.
Sourcing the Right Parts
To ensure compatibility and longevity, it’s crucial to use genuine John Deere parts. You can purchase these parts from authorized John Deere dealers or their online store. Ensure you have the correct part number, which can be found in the machine’s manual or in a John Deere parts catalog.
Preparing for Replacement
Before beginning any replacement, ensure the harvester is on a level surface and turned off. Disconnect the battery to prevent any electrical accidents. Gather all necessary tools and safety equipment, such as gloves and safety glasses.
Removing the Faulty Part
Carefully remove the faulty part by following the steps outlined in the manual. This often involves loosening bolts, disconnecting electrical wires, and detaching the part from its housing. Keep track of all screws, bolts, and small components to ensure nothing gets lost.
Installing the New Part
Position the new part in place and secure it with bolts and screws. Reconnect any electrical wires or hydraulic lines. Ensure all connections are tight and secure to prevent future issues.
Testing the Machine
After installation, test the machine to ensure the new part is functioning correctly. Start the engine, check for leaks, and monitor the performance. If everything operates smoothly, the replacement was successful.
Regular Maintenance
Establish a regular maintenance schedule to prevent future issues. This includes routine checks of critical components, timely oil changes, and keeping the machine clean. Regular maintenance can extend the lifespan of your harvester and reduce the frequency of part replacements.
Upgrading John Deere Harvesters
Upgrading your John Deere harvester can significantly enhance its performance, efficiency, and longevity. Here are some practical upgrades to consider:
Engine Upgrades
Upgrading to a more powerful engine can increase your harvester’s capacity and efficiency. Consider engines that offer better fuel efficiency and lower emissions. Consult with a John Deere dealer to find compatible engine upgrades.
Advanced GPS and Precision Farming Tools
Modern John Deere harvesters can be equipped with advanced GPS systems and precision farming tools. These technologies can improve accuracy in planting, harvesting, and applying fertilizers, leading to higher yields and reduced waste.
Improved Hydraulic Systems
Upgrading the hydraulic system can enhance the responsiveness and power of your harvester. Look for high-efficiency pumps and advanced hydraulic controls that offer better performance and durability.
Enhanced Comfort Features
Operator comfort is essential for long hours in the field. Upgrading the cab with better seats, climate control, and advanced controls can make a significant difference. Consider investing in noise reduction and vibration-dampening features as well.
Automated Systems
Automation is becoming increasingly important in modern agriculture. Upgrading to automated steering and harvesting systems can reduce operator fatigue and increase precision. John Deere offers several automation solutions that can be retrofitted to older models.
Conclusion
Maintaining and upgrading John Deere harvesters is a practical necessity for maximizing efficiency and productivity. By understanding common issues, following systematic troubleshooting steps, and knowing how to replace and upgrade parts, you can ensure your harvester remains in optimal condition. Regular maintenance and timely upgrades not only extend the lifespan of your equipment but also improve your overall farming operations.
Investing in genuine John Deere harvester parts and leveraging the latest technology will keep you ahead in the ever-evolving agricultural industry. Remember, the key to a successful harvest lies in the reliability of your machinery. With the right approach, your John Deere harvester will continue to deliver exceptional performance season after season.
Apart from this, if you are interested to know more about Ozzy Tyres then visit our Automobile category.


